
Friday, February 12, 2010
Starting to put down the tile
Sunday, January 31, 2010
Bathroom Part 4: Install the backerboard
 First Piece of backboard is now glued down. I'm using hardibacker 1/8" thick. It's being glued down with pre-mixed thin set.
 On the last time job I did I used a much more expensive glue, but when I picked up that stuff this time the tile guy working in the hardware store told me to just mix up my own thinset. He claimed that would work much better than the more expensive mix I was going to use. I told him I really wanted pre-mixed and he said I should use pre-mix thin set then. It was a savings of about $15. It seemed to work just as well as the more expensive stuff. Next time, I think I am going to try to mix it myself which cuts the price in half.
Friday, January 29, 2010
Bathroom Construction Part 3: Self Leveler

I mixed up about 3 pounds of compound on the first two pours and found that was too much to work with at one time. I ended up throwing away half the mix on the first pour and thought I could do better on the second, but the same thing happened. For future pours, I'll keep the mix to about 1.5 pounds of self leveler.
p.s. The floor was primed with the latex primer before I poured on the leveling compound.
Wednesday, January 27, 2010
Bathroom Construction Part 2: plywood removed

Tuesday, January 26, 2010
Bathroom Constuction Part 1
 Our master bathroom needs a major remodel. The first step was to get rid of the old tile. Step one, rip it up and see the condition of the sub floor. Unfortunately, as you can see from this picture, the subfloor was completely water damaged. It looks like this will have to be completely ripped out and replaced with some cement board.
Saturday, January 23, 2010
Fixing my 2005 BMW 325i Door Leak
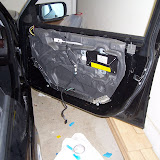 |
| 2005 BMW 325i Door Leak |